博客刚弄好,还是有不少问题的。比如图片不能点击放大,也没有评论功能(虽然没什么人会评论吧)。于是乎想着整一个Waline评论系统,其实Waline文档写的挺详细的,不过还是因自身需求做些改动水一下好了,感兴趣的可以查阅:
添加Waline评论系统
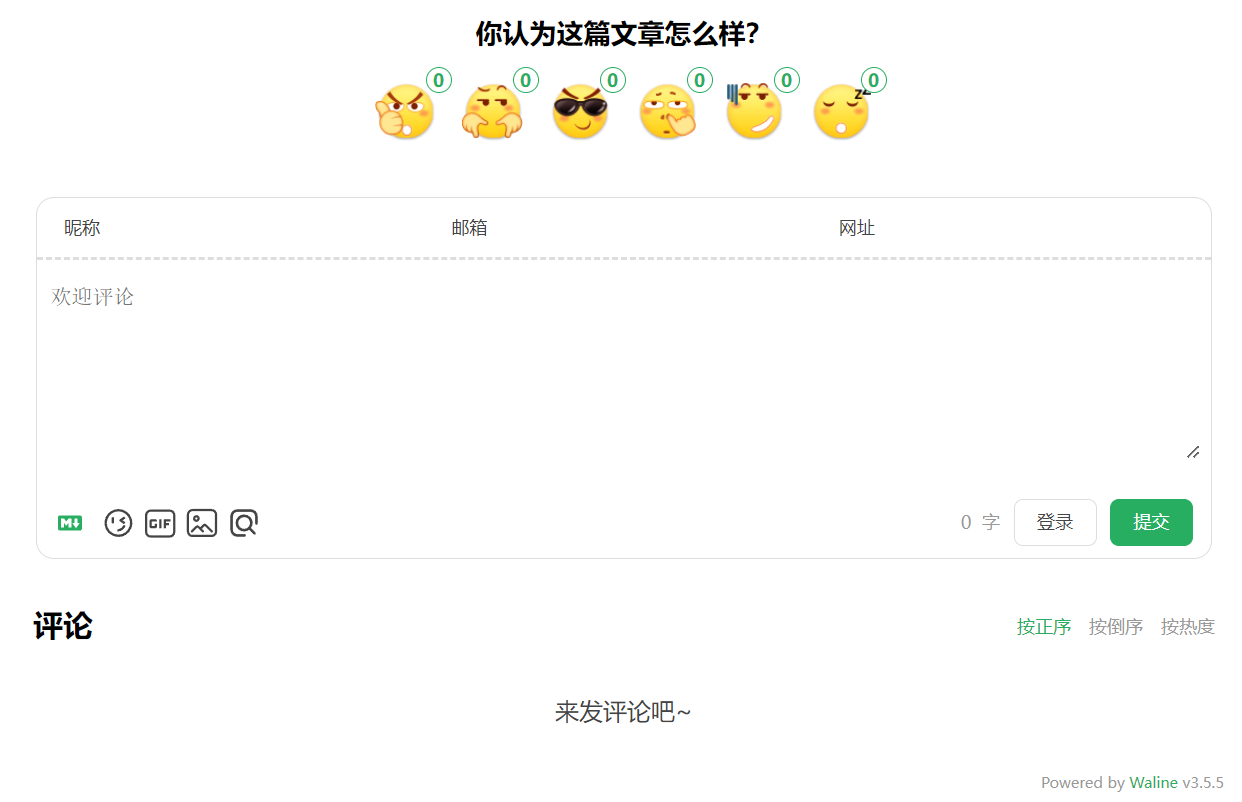
博客搭建完成之后,可以添加一个评论系统。这里选用的是 Waline,因为 Hugo Stack 主题支持 Waline,所以配置起来也会方便不少。同时Waline只需几个步骤,就可以在你的网站中启用 Waline 提供评论服务,并对评论配置tg通知。
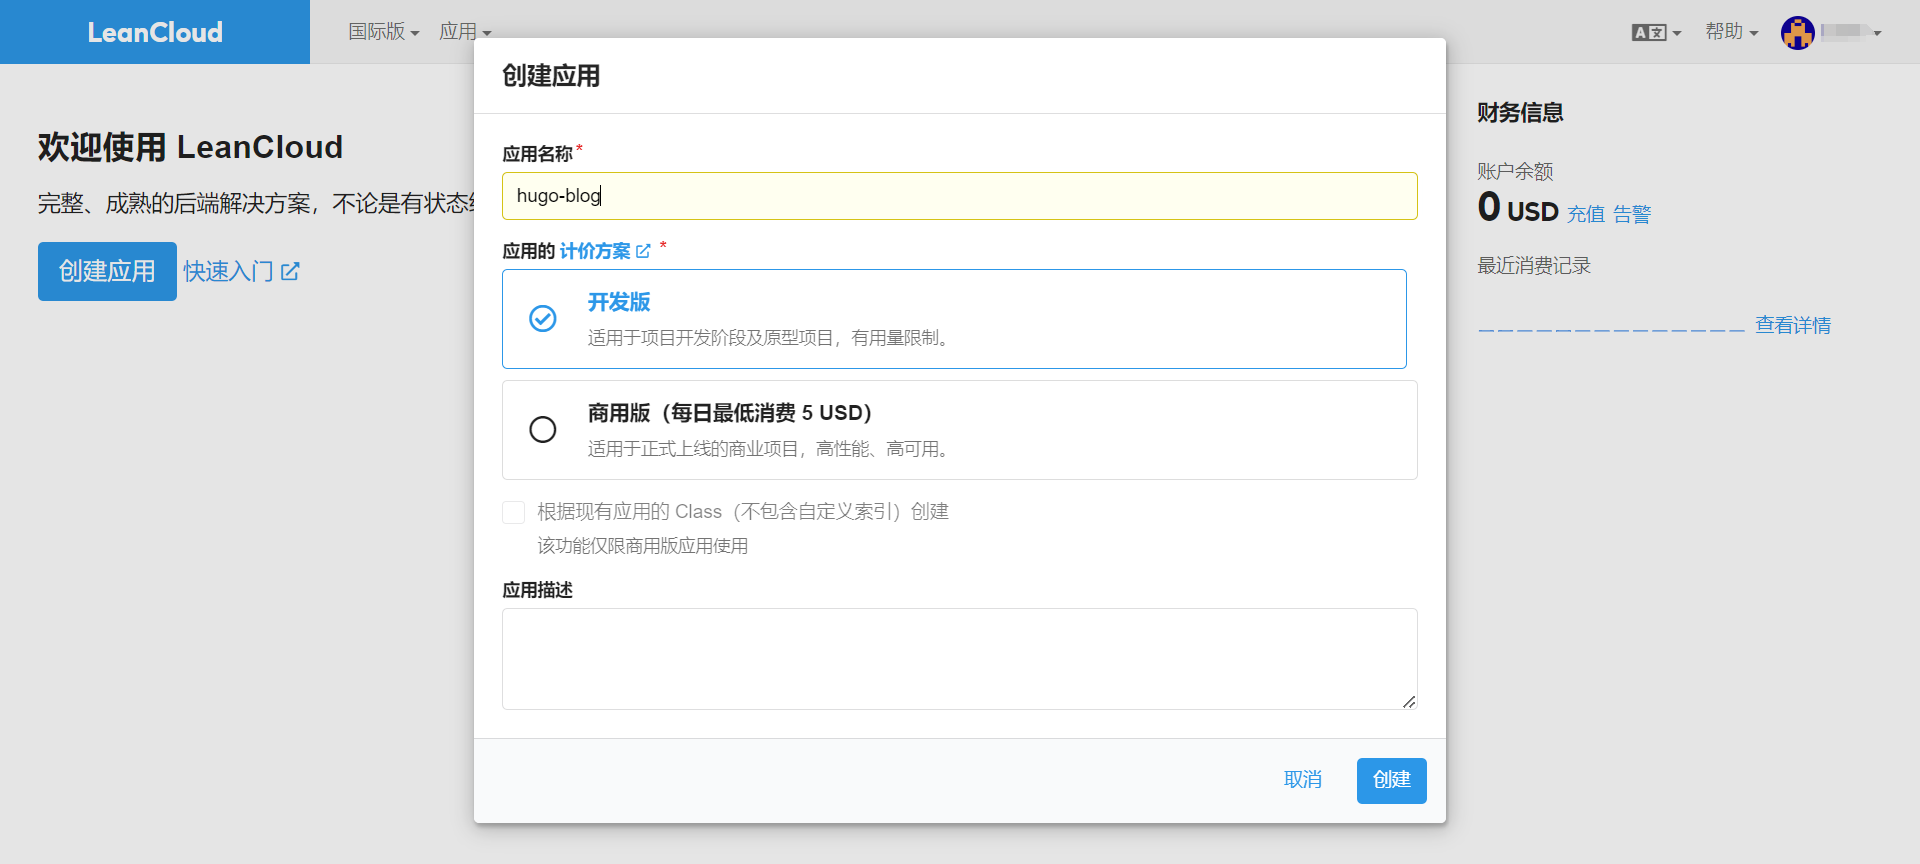
LeanCloud 设置 (数据库)
点击 创建应用 并起一个你喜欢的名字 (选择免费的开发版):
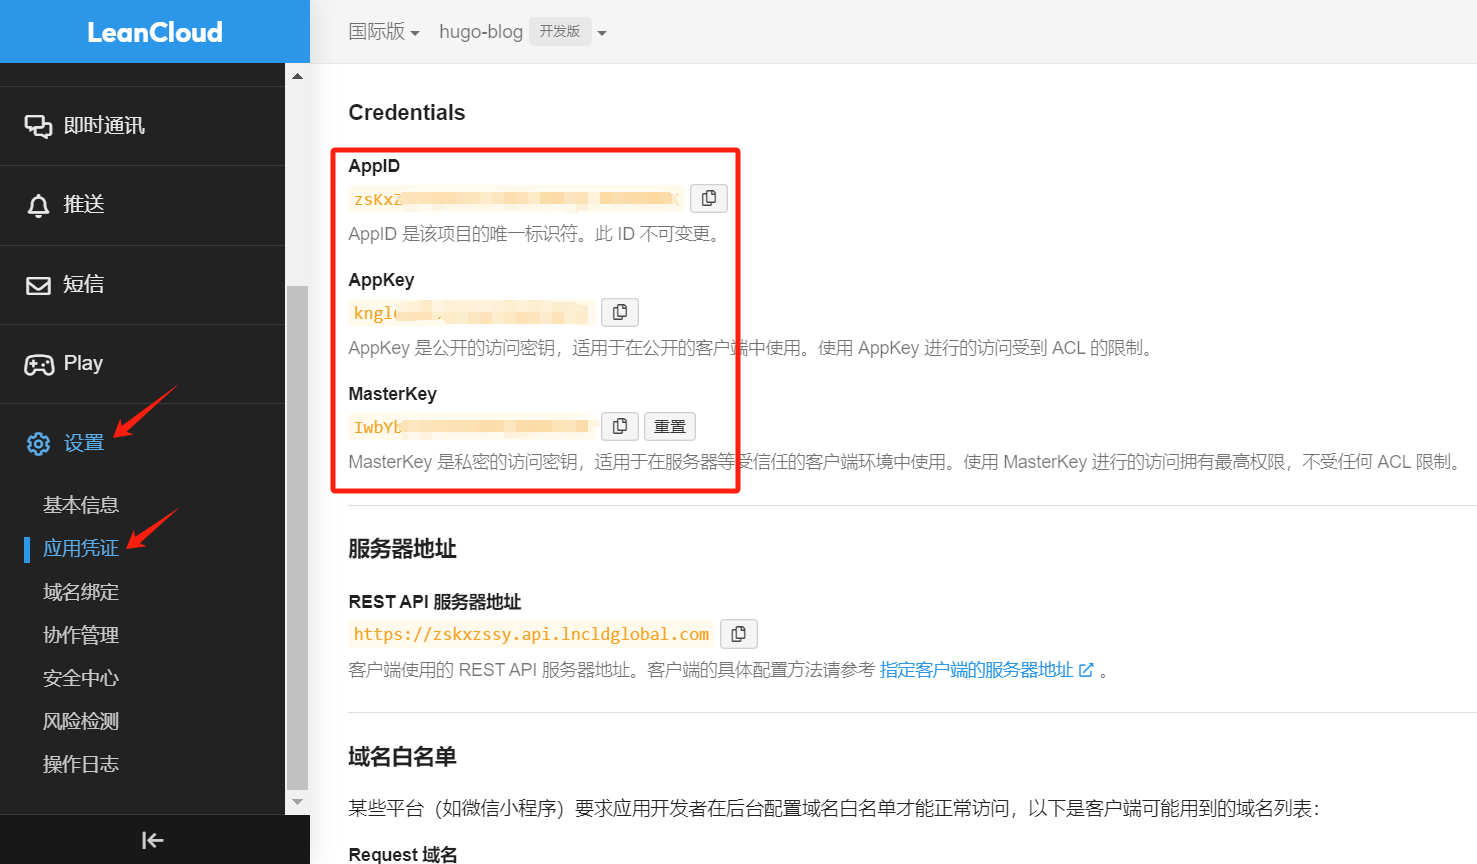
进入应用,选择左下角的 设置 -> 应用 Key。你可以看到你的 APP ID, APP Key 和 Master Key。请记录它们,以便后续使用。
Vercel 部署 (服务端)
输入一个你喜欢的项目名称并点击 Create 继续
此时 Vercel 会基于 Waline 模板帮助你新建并初始化仓库,仓库名为你之前输入的项目名。
一两分钟后,满屏的烟花会庆祝你部署成功。此时点击 Go to Dashboard 可以跳转到应用的控制台。
点击顶部的 Settings - Environment Variables 进入环境变量配置页,并配置三个环境变量 LEAN_ID, LEAN_KEY 和 LEAN_MASTER_KEY 。它们的值分别对应上一步在 LeanCloud 中获得的 APP ID, APP KEY, Master Key。

添加 Telegram 通知
Telegram 通知通过 Telegram bot 机器人实现,需要配置以下几个环境变量:
TG_BOT_TOKEN: Telegram 机器人用于访问 HTTP API 的 token,通过 @BotFather 创建机器人获取,必填。TG_CHAT_ID: 接收消息对象的chat_id,可以是单一用户、频道、群组,通过 @userinfobot 获取,必填。AUTHOR_EMAIL: 博主邮箱,用来区分发布的评论是否是博主本身发布的。如果是博主发布的则不进行提醒通知。SITE_NAME: 网站名称,用于在消息中显示。SITE_URL: 网站地址,用于在消息中显示。TG_TEMPLATE: Telegram 使用的通知模板,变量与具体格式可参见下文的通知模板。未配置则使用默认模板。
如果你想让评论要经审核才发布的话,可以加上以下变量:
COMMENT_AUDIT-true
开启后评论需要经过管理员审核后才能显示,所以建议在评论框默认文字上提供提示。
环境变量配置完成并保存后点击 Redeploy 按钮进行重新部署,让刚才设置的环境变量生效。
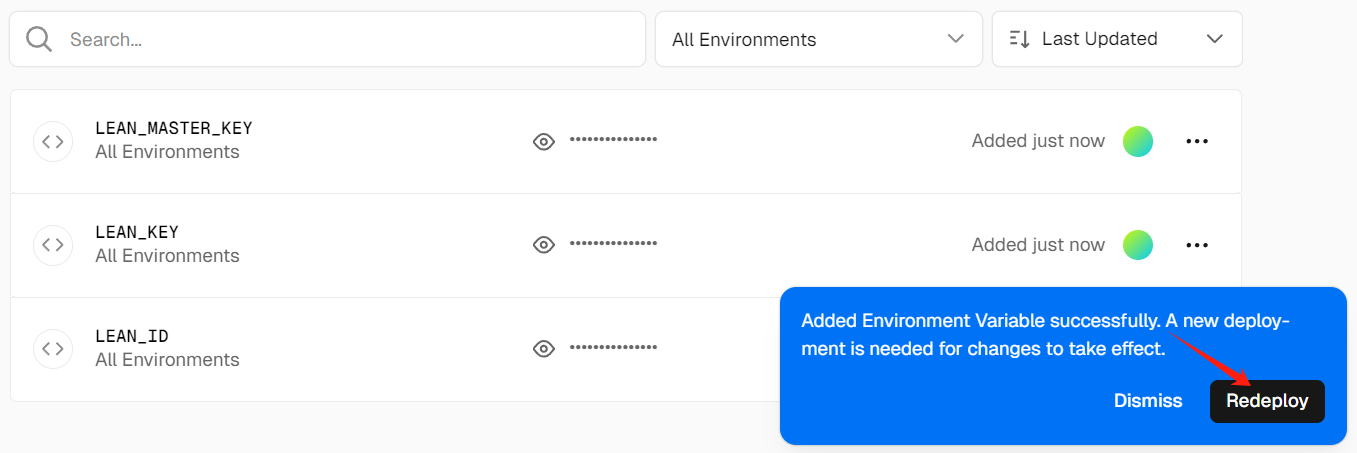
此时会跳转到 Overview 界面开始部署,等待片刻后 STATUS 会变成 Ready。此时请点击 Visit ,即可跳转到部署好的网站地址,此地址即为你的服务端地址。
但是由于vercel.app被污染了,所以你需要添加自定义域(在cf托管的即可)。

主题启用 Waline
在 hugo.yaml 配置文件里找到这一区块:
1params:
2    comments:
3        enabled: true
4        provider:
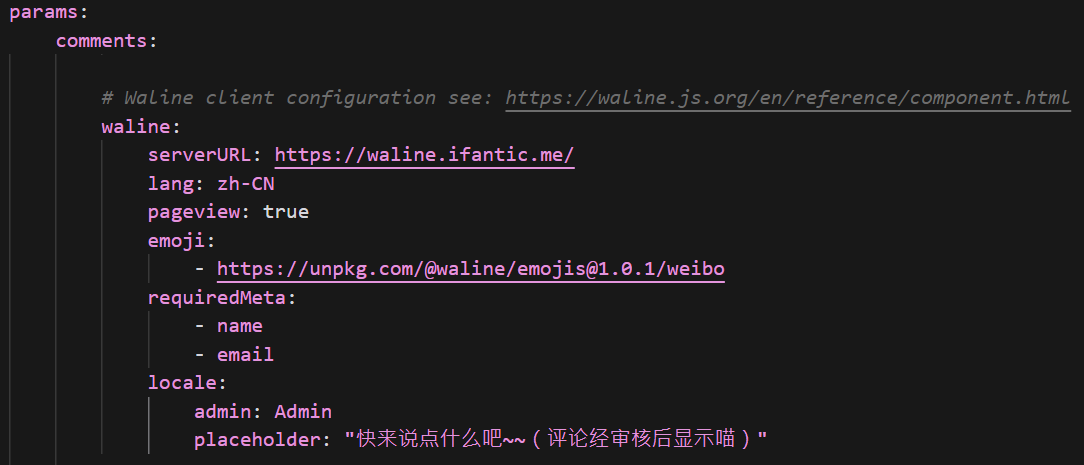
将 enabled 改 true,provider 改为 waline,然后在 comments.waline 区块设置 waline 的相关配置:
 1# Waline client configuration see: https://waline.js.org/en/reference/component.html
 2waline:
 3    serverURL: your-server-url
 4    lang: zh-CN
 5    pageview: true
 6    emoji:
 7        - https://unpkg.com/@waline/[email protected]/weibo
 8    requiredMeta:
 9        - name
10        - email
11    locale:
12        admin: Admin
13        placeholder: "快来说点什么吧~~(评论经审核后显示喵)"
serverURL 改为你的 vercel 的服务端地址即可。
部署完成后,请访问 <serverURL>/ui/register 进行注册。首个注册的人会被设定成管理员。
管理员登陆后,即可看到评论管理界面。在这里可以修改、标记或删除评论。用户也可通过评论框注册账号,登陆后会跳转到自己的档案页。
fancybox灯箱导入使图片能够点击放大
- 修改
config.toml或者hugo.yaml
我使用的是stack主题,配置文件为 hugo.yaml,在params中添加:
1params:
2  fancybox: true

- 创建并修改
render-image.html
创建路径为 /layouts/_default/_markup/render-image.html,填入以下内容:
1{{if .Page.Site.Params.fancybox }}
2<div class="post-img-view">
3<a data-fancybox="gallery" href="{{ .Destination | safeURL }}">
4<img src="{{ .Destination | safeURL }}" alt="{{ .Text }}" {{ with .Title}} title="{{ . }}"{{ end }} />
5</a>
6</div>
7{{ end }}
- 在
footer.html添加内容
在 layouts\partials\article\components\footer.html 中添加
1{{if .Page.Site.Params.fancybox }}
2<script src="https://cdn.jsdelivr.net/npm/[email protected]/dist/jquery.min.js"></script>
3<link rel="stylesheet" href="https://cdn.jsdelivr.net/gh/fancyapps/[email protected]/dist/jquery.fancybox.min.css" />
4<script src="https://cdn.jsdelivr.net/gh/fancyapps/[email protected]/dist/jquery.fancybox.min.js"></script>
5{{ end }}
即可启用灯箱,舒舒服服地放大图片啦!
取消 markdown 严格换行
参考hugo换行 - Bboysoul’s Blog,不修改之前一定要在markdown换两行才能在博文里换行,实在是太烦了。
其实只要在 hugo.yaml 里面对应的选项里添加: hardWraps: true
1markup:
2  goldmark:
3    renderer:
4      hardWraps: true
文章添加密码
依旧是找找有没有大神的作业能参考,找来找去大差不差,也不知道哪个是源头,姑且贴一个远古的博客链接罢:
Hugo系列(3.1) - LoveIt主题美化与博客功能增强 · 第二章 - 雨临Lewis
但是呢,并不适用于hugo-theme-stack,要不输入正确的密码后变成空白页还是打不开,要不就报错不能用。没办法,食過返尋味,再一次施展AI大法,在 layouts/_default/single.html 中找到 {{ define "main" }} 和 {{ partial "article/article.html" . }} 的中间部分,粘贴代码:
 1<!-- 以上代码不变 -->
 2{{ define "main" }}
 3    {{ if .Params.password }}
 4    <div class="post-password-protection">
 5    <script>
 6        (function(){
 7        // Store the password from the front matter
 8        const correctPassword = {{ .Params.password }};
 9        // Prompt for password
10        const enteredPassword = prompt('请输入文章密码:');
11
12        // Check if password is correct
13        if (enteredPassword !== correctPassword) {
14            alert('密码错误!');
15            // Redirect back or close window
16            if (history.length <= 1) {
17            window.opener = null;
18            window.open('', '_self');
19            window.close();
20            } else {
21            history.back();
22            }
23        }
24        })();
25    </script>
26    </div>
27    {{ end }}
28
29    {{ partial "article/article.html" . }}
30    <!-- 以上下代码不变 -->
然后在你要加密的文章顶部信息处加入密码即可:
1---
2title: 随笔
3password: test
4---
测试链接(密码:test)
然后我又发现一个问题,输错密码在返回的时候会短暂的闪现出加密文章的界面。再次狠狠地CPU Claude3.7,顺便把一次性检验与永久检验做出来了。把整个 single.html 改成如下内容:
  1{{ define "body-class" }}
  2    article-page
  3    {{/* Widget logic remains unchanged */}}
  4    {{- $HasWidgetNotTOC := false -}}
  5    {{- $TOCWidgetEnabled := false -}}
  6    {{- range .Site.Params.widgets.page -}}
  7        {{- if ne .type "toc" -}}
  8            {{ $HasWidgetNotTOC = true -}}
  9        {{- else -}}
 10            {{ $TOCWidgetEnabled = true -}}
 11        {{- end -}}
 12    {{- end -}}
 13
 14    {{- $TOCManuallyDisabled := eq .Params.toc false -}}
 15    {{- $TOCEnabled := and (not $TOCManuallyDisabled) $TOCWidgetEnabled -}}
 16    {{- $hasTOC := ge (len .TableOfContents) 100 -}}
 17    {{- .Scratch.Set "TOCEnabled" (and $TOCEnabled $hasTOC) -}}
 18
 19    {{- .Scratch.Set "hasWidget" (or $HasWidgetNotTOC (and $TOCEnabled $hasTOC)) -}}
 20{{ end }}
 21
 22{{ define "main" }}
 23    {{ if .Params.password }}
 24    <style>
 25        /* Hide content by default when password protection is enabled */
 26        .article-content, .article-header, .article-footer, .article-image,
 27        .related-content, .article-links, #comments {
 28            display: none;
 29        }
 30        /* Only show content when authorized class is added */
 31        .password-authorized .article-content,
 32        .password-authorized .article-header,
 33        .password-authorized .article-footer,
 34        .password-authorized .article-image,
 35        .password-authorized .related-content,
 36        .password-authorized .article-links,
 37        .password-authorized #comments {
 38            display: block;
 39        }
 40    </style>
 41    <div class="post-password-protection">
 42    <script>
 43        (function(){
 44            // Generate a unique key for this article
 45            const articleId = "{{ .File.UniqueID | default .Permalink }}";
 46            const storageKey = "article_auth_" + articleId;
 47            const correctPassword = "{{ .Params.password }}";
 48            // Check if persistent authentication is enabled (default: false)
 49            const persistAuth = {{ .Params.persistAuth | default false }};
 50
 51            let isAuthorized = false;
 52
 53            // Only check localStorage if persistent auth is enabled
 54            if (persistAuth) {
 55                isAuthorized = localStorage.getItem(storageKey) === "true";
 56            }
 57
 58            if (!isAuthorized) {
 59                // Prompt for password
 60                const enteredPassword = prompt('请输入文章密码:');
 61
 62                // 用户点击了取消按钮
 63                if (enteredPassword === null) {
 64                    if (history.length <= 1) {
 65                        window.opener = null;
 66                        window.open('', '_self');
 67                        window.close();
 68                    } else {
 69                        history.back();
 70                    }
 71                    return;
 72                }
 73
 74                // 用户输入了密码但不正确
 75                if (enteredPassword !== correctPassword) {
 76                    alert('密码错误!');
 77                    if (history.length <= 1) {
 78                        window.opener = null;
 79                        window.open('', '_self');
 80                        window.close();
 81                    } else {
 82                        history.back();
 83                    }
 84                    return;
 85                }
 86
 87                // 密码正确
 88                if (persistAuth) {
 89                    localStorage.setItem(storageKey, "true");
 90                }
 91                isAuthorized = true;
 92            }
 93
 94            // If we reach here, user is authorized
 95            document.addEventListener('DOMContentLoaded', function() {
 96                document.body.classList.add('password-authorized');
 97            });
 98        })();
 99
100    </script>
101    </div>
102    {{ end }}
103
104    {{ partial "article/article.html" . }}
105
106    {{ if .Params.links }}
107        {{ partial "article/components/links" . }}
108    {{ end }}
109
110    {{ partial "article/components/related-content" . }}
111
112    {{ if not (eq .Params.comments false) }}
113        {{ partial "comments/include" . }}
114    {{ end }}
115
116    {{ partialCached "footer/footer" . }}
117
118    {{ partialCached "article/components/photoswipe" . }}
119{{ end }}
120
121{{ define "right-sidebar" }}
122    {{ if .Scratch.Get "hasWidget" }}{{ partial "sidebar/right.html" (dict "Context" . "Scope" "page") }}{{ end}}
123{{ end }}
就把加密文章的问题解决啦!如果你想用一次性验证的话,就用上面那个默认密码设置就好。想永久身份验证的话,就可以添加以下配置:
1---
2title: 测试
3password: test
4persistAuth: true
5---
永久验证测试链接(密码:test)
上面的两个测试链接都有樱花特效哦,具体配置见下面
2025.4.7 更新
上面的加密方法其实只是图一乐而已啦!
想要真正比较安全的加密,可以看看这篇文章 ~
把文章从主页和归档中隐藏
上面整出来的这两篇文章仅仅只是为了测试,放在首页和归档页好像不太好。好在官方有解决办法,在文章的设置里加上:
1---
2title: "测试"
3description:
4hidden: true
5---
但是我发现这么操作的话,底部卜算子的统计和热力图还是会检索到这篇文章。于是把参数改一下:
1---
2title: "测试"
3description:
4_build:
5    list: false  # 不在列表(主页/归档)中显示
6    render: true # 仍生成最终页面
7---
这样的话热力图和底下的统计信息也没把他们算进去了,除非你公布链接,不然它们就像销声匿迹了一样 ~
加载进度条
参考博客切换到STACK 主题 - 一不留神的博客,在 layouts/partials/footer/custom.html 后面加入:
1<script src="https://cdn.jsdelivr.net/gh/zhixuan2333/[email protected]/js/nprogress.min.js" integrity="sha384-bHDlAEUFxsRI7JfULv3DTpL2IXbbgn4JHQJibgo5iiXSK6Iu8muwqHANhun74Cqg" crossorigin="anonymous"></script>
2<link rel="stylesheet" href="https://cdn.jsdelivr.net/gh/zhixuan2333/[email protected]/css/nprogress.css" integrity="sha384-KJyhr2syt5+4M9Pz5dipCvTrtvOmLk/olWVdfhAp858UCa64Ia5GFpTN7+G4BWpE" crossorigin="anonymous" />
3<script>
4    NProgress.start();
5    document.addEventListener("readystatechange", () => {
6        if (document.readyState === "interactive") NProgress.inc(0.8);
7        if (document.readyState === "complete") NProgress.done();
8    });
9</script>
分类卡片添加图片
在 content\categories 下添加分类文件夹,如 blog 。然后在文件夹里创建一个 _index.md ,输入以下内容:
1---
2title: "Blog"
3descript: "博客"
4image: "blog.png"
5weight: 4
6---
其中 image 就是你在该分类文件夹下的图片名称,然后 descript 参数发现好像没什么用 🤷♂️
归档页分类卡片缩放动画
参考Hugo Stack 魔改美化 - Naive Koala,在 /assets/scss/custom.scss 中加入以下代码:
1/*-----------归档页面----------*/
2//归档页面卡片缩放
3.article-list--tile article {
4  transition: .6s ease;
5}
6
7.article-list--tile article:hover {
8  transform: scale(1.03, 1.03);
9}
移除相关文章中的遮罩
这个相关文章的图片有一层上黑下透的遮罩,我只能说丑爆了好吗 🤷♂️

按照这篇文章的做法:如何优雅的从 Hexo 转移 Blog 到 Hugo - SDLMoe,在 assets/scss/partials/layout/article.scss 中删除以下代码:
1&.has-image {
2    .article-details {
3        padding: 20px;
4        background: linear-gradient(0deg, rgba(0, 0, 0, 0.25) 0%, rgba(0, 0, 0, 0.75) 100%);
5    }
6}
然后进一步移除 assets/ts/main.ts 中的 30-59 行,就搞定啦!

樱花特效
无意间撞到【Web】博客、个人网站背景美化的几个方法(sakura / canvas-nest / particles)- 星野睡不醒这篇文章,看别人弄出来的效果有点心动呢
只需要在主页插入:
1<script type="text/javascript" src="https://cdn.jsdelivr.net/gh/Ukenn2112/[email protected]/index/web.js"></script>
不过弄了之后觉得有点花里胡哨的,不确定我有哪篇帖子适合(姑且放测试帖子里吧,具体链接在上面
返回顶部按钮
在阅读长文章时,如果想返回顶部没有快捷按钮则是很不方便的,所以添加一个按钮
在 /layouts/partials/footer/custom.html 里面添加如下代码:
  1<!--返回顶部按钮 -->
  2<a href="#" id="back-to-top" title="返回顶部"></a>
  3
  4<!--返回顶部CSS -->
  5<style>
  6  #back-to-top {
  7    display: none;
  8    position: fixed;
  9    bottom: 20px;
 10    right: 55px;
 11    width: 55px;
 12    height: 55px;
 13    border-radius: 7px;
 14    background-color: rgba(64, 158, 255, 0.5);
 15    box-shadow: var(--shadow-l2);
 16    font-size: 30px;
 17    text-align: center;
 18    line-height: 50px;
 19    cursor: pointer;
 20  }
 21
 22  #back-to-top:before {
 23    content: ' ';
 24    display: inline-block;
 25    position: relative;
 26    top: 0;
 27    transform: rotate(135deg);
 28    height: 10px;
 29    width: 10px;
 30    border-width: 0 0 2px 2px;
 31    border-color: var(--back-to-top-color);
 32    border-style: solid;
 33  }
 34
 35  #back-to-top:hover:before {
 36    border-color: #2674e0;
 37  }
 38
 39  /* 在屏幕宽度小于 768 像素时,钮位置调整 */
 40  @media screen and (max-width: 768px) {
 41    #back-to-top {
 42      bottom: 20px;
 43      right: 20px;
 44      width: 40px;
 45      height: 40px;
 46      font-size: 10px;
 47    }
 48  }
 49
 50  /* 在屏幕宽度大于等于 1024 像素时,按钮位置调整 */
 51  @media screen and (min-width: 1024px) {
 52    #back-to-top {
 53      bottom: 20px;
 54      right: 40px;
 55    }
 56  }
 57
 58  /* 在屏幕宽度大于等于 1280 像素时,按钮位置调整 */
 59  @media screen and (min-width: 1280px) {
 60    #back-to-top {
 61      bottom: 20px;
 62      right: 55px;
 63    }
 64  }
 65
 66  /* 目录显示时,隐藏按钮 */
 67  @media screen and (min-width: 1536px) {
 68    #back-to-top {
 69      visibility: hidden;
 70    }
 71  }
 72</style>
 73
 74<!--返回顶部JS -->
 75<script>
 76  function backToTop() {
 77    document.documentElement.scrollIntoView({
 78      behavior: 'smooth',
 79    })
 80  }
 81
 82  window.onload = function () {
 83    let scrollTop =
 84      this.document.documentElement.scrollTop || this.document.body.scrollTop
 85    let totopBtn = this.document.getElementById('back-to-top')
 86    if (scrollTop > 0) {
 87      totopBtn.style.display = 'inline'
 88    } else {
 89      totopBtn.style.display = 'none'
 90    }
 91  }
 92
 93  window.onscroll = function () {
 94    let scrollTop =
 95      this.document.documentElement.scrollTop || this.document.body.scrollTop
 96    let totopBtn = this.document.getElementById('back-to-top')
 97    if (scrollTop < 200) {
 98      totopBtn.style.display = 'none'
 99    } else {
100      totopBtn.style.display = 'inline'
101      totopBtn.addEventListener('click', backToTop, false)
102    }
103  }
104</script>
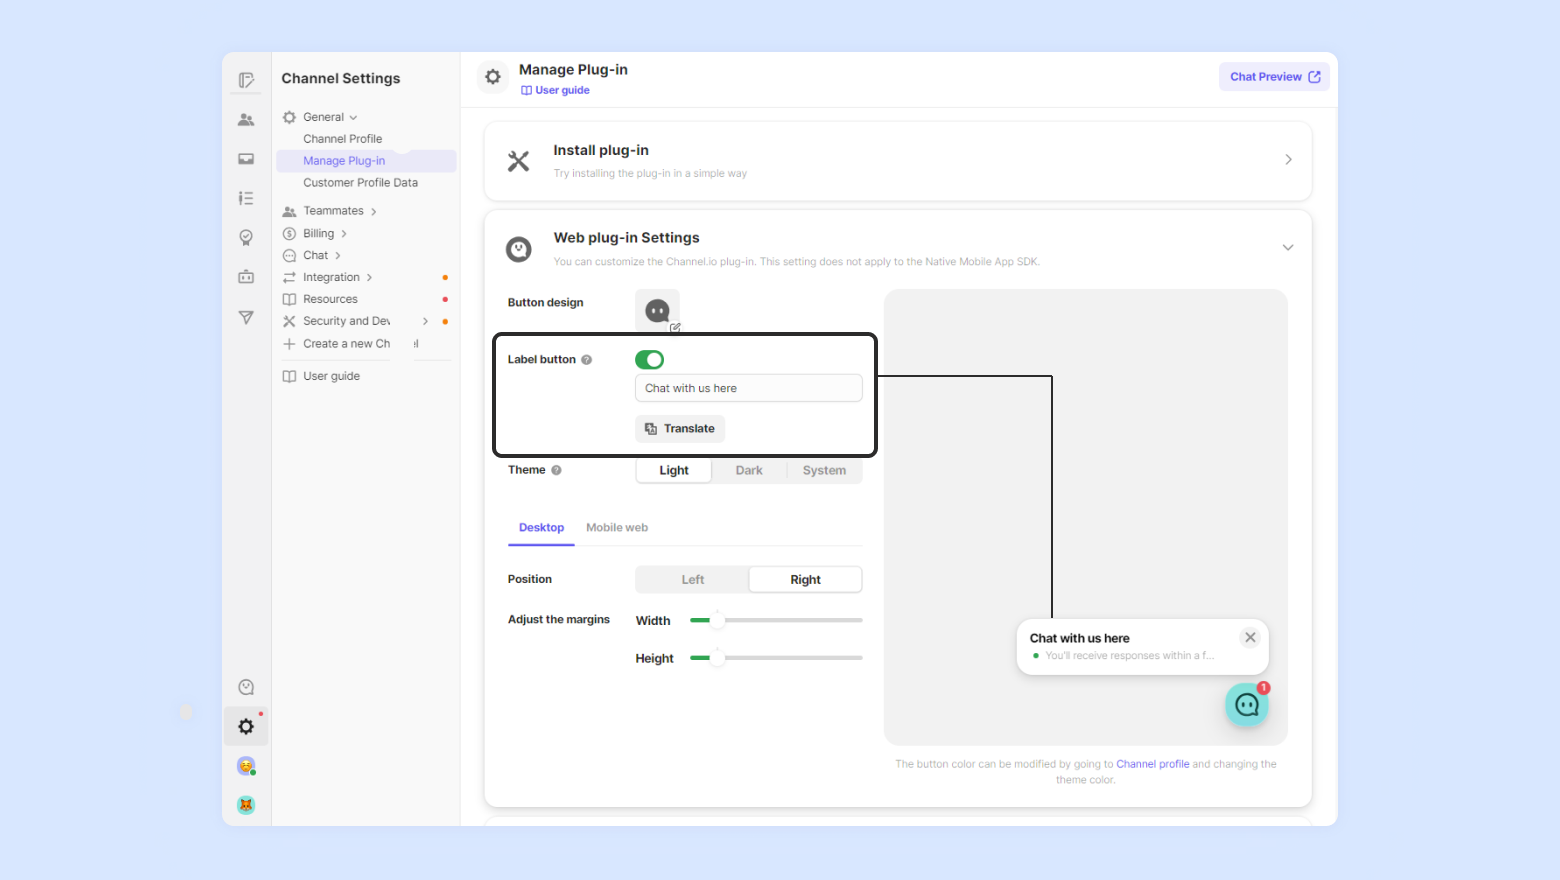
添加右下角联系小气泡按钮
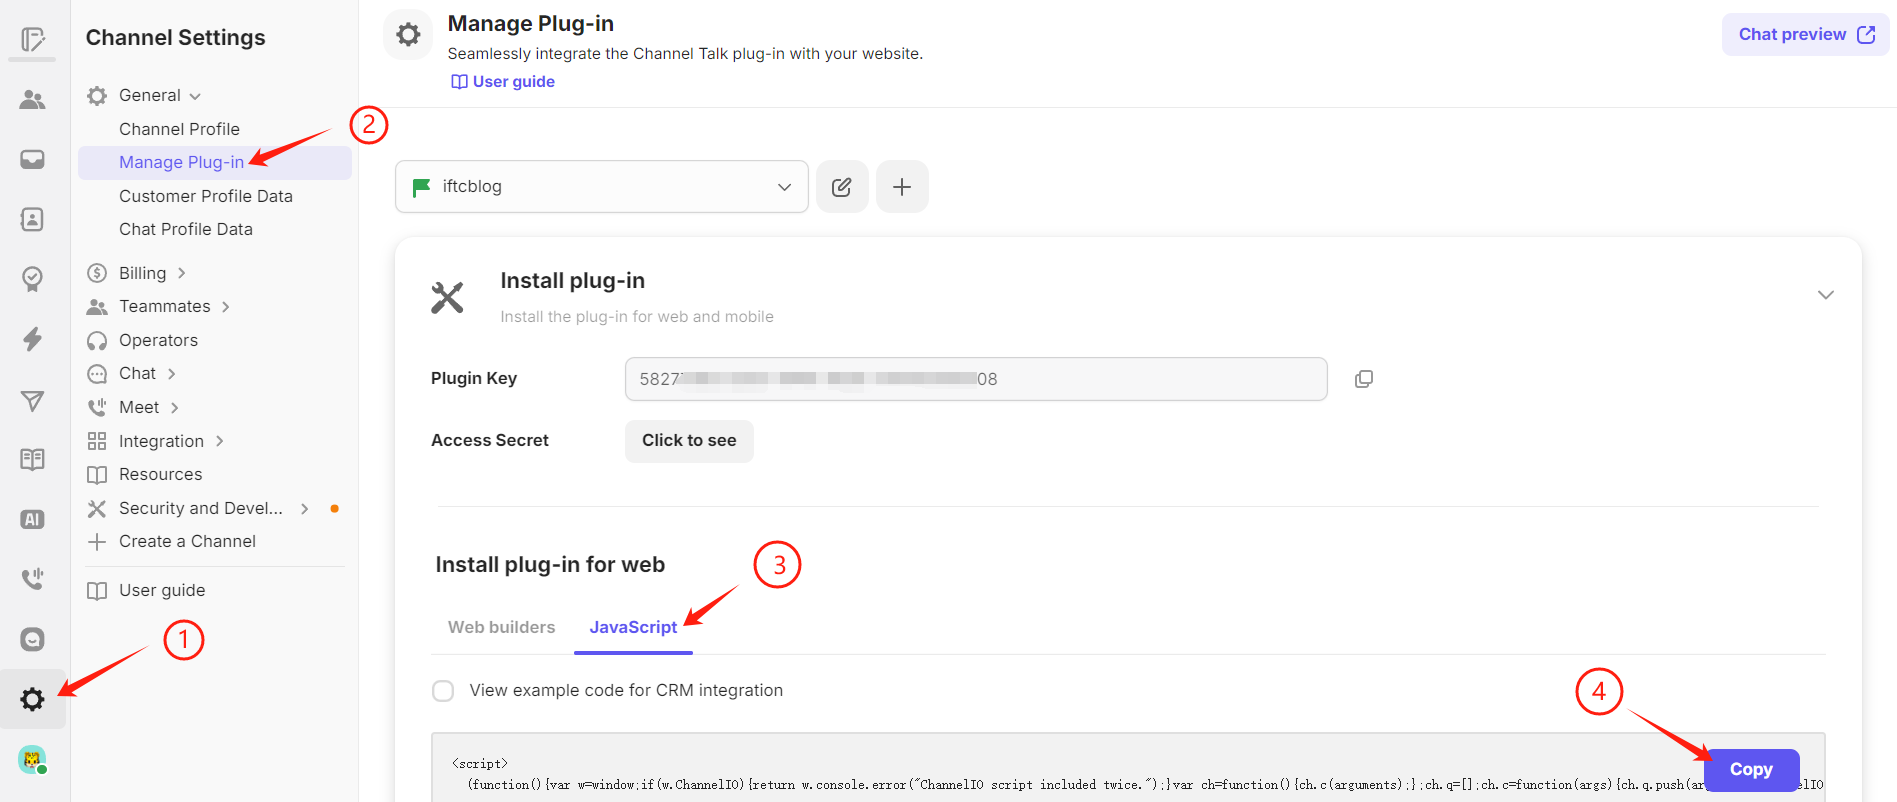
是一个日本公司提供的服务Channel.io,网页气泡是个入口,实际聊天可以在它们的App里完成。配置过程和山茶花舍说的一样,在官网注册完之后,点击小齿轮 – General – Manage Plug-in – Install plug-in – 点击JavaScript并复制框里的代码,粘贴到 layouts/partials/footer/custom.html 就可以啦。具体可以参考这篇博客:
Hugo Stack主题装修笔记 - 第三夏尔 | Third Shire
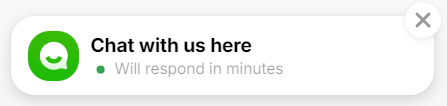
如果嫌刚开始弹出来的那个气泡很烦的话,可以在设置里把他关掉:
图片轮播
照抄大佬的博客Hugo | 在文章中插入轮播图片 - 小球飞鱼,在 layout/shortcodes 文件夹中创建 imgloop.html 短代码模板:
 1{{ if .Site.Params.enableimgloop }}
 2    <link rel="stylesheet" href="https://cdnjs.cloudflare.com/ajax/libs/Swiper/3.4.2/css/swiper.min.css">
 3    <!-- Swiper -->
 4    <div class="swiper-container">
 5        <div class="swiper-wrapper">
 6            {{$itItems := split (.Get 0) ","}}
 7            {{range $itItems }}
 8            <div class="swiper-slide">
 9                <img src="{{.}}" alt="">
10            </div>
11            {{end}}
12        </div>
13        <!-- Add Pagination -->
14        <div class="swiper-pagination"></div>
15    </div>
16
17    <script src="https://cdnjs.cloudflare.com/ajax/libs/Swiper/3.4.2/js/swiper.min.js"></script>
18     <!-- Initialize Swiper -->
19     <script>
20        var swiper = new Swiper('.swiper-container', {
21            pagination: '.swiper-pagination',
22            paginationClickable: true,
23        //自动调节高度
24        autoHeight: true,
25        //键盘左右方向键控制
26        keyboardControl : true,
27        //鼠标滑轮控制
28        mousewheelControl : true,
29        //自动切换
30        //autoplay : 5000,
31        //懒加载
32        lazyLoading : true,
33		lazyLoadingInPrevNext : true,
34		//无限循环
35		loop : true,
36        });
37        </script>
38{{ end }}
在 assets/scss/cutom.scss 中加入如下代码:
 1.swiper-container {
 2    max-width: 820px;
 3    margin: 2em auto;
 4
 5}
 6.swiper-slide {
 7    text-align: center;
 8    font-size: 18px;
 9    background-color: #fff;
10    /* Center slide text vertically */
11    display: flex;
12    justify-content: center;
13    align-items: center;
14    img {
15        margin: 0 !important;
16    }
17}
最后在 hugo.yaml 的 params 配置下加入 enableimgloop: true就可以啦!
鼠标烟花特效
参考Hugo | 记录MemE主题美化过程 - Zoe’s Dumpster.,在 layouts/partials/footer/components/script.html 最后加入以下代码:
1<!--鼠标点击特效,烟花效应-->
2<script src="https://cdn.jsdelivr.net/gh/ZhaoUncle/image@main/static/mouse-click.js"></script>
3<canvas width="1777" height="841" style="position: fixed; left: 0px; top: 0px; z-index: 2147483647; pointer-events: none;"></canvas>
固定代码块高度
参考hugo stack 主题美化 - Yelle🦋 ,把以下内容添加到 assets/scss/partials/article.scss :
 1    .article-content {
 2        .highlight {
 3            padding: var(--card-padding);
 4            pre {
 5                margin: initial;
 6                padding: var(--card-padding);
 7                margin: 0;
 8                width: auto;
 9                max-height: 20em;
10                scrollbar-width: none;
11                /* Firefox */
12                &::-webkit-scrollbar {
13                    display: auto;
14                    /* Chrome Safari */
15                }
16            }
17        }
18    }
但是我发现代码块有个问题:行号和代码都有滚动条。这怎么回事呢?查来查去翻来覆去踌躇了三天,又问了ai也搞不定。最后才发现代码块与行号居然是分开滚动的。还有这种事?迅速找到 hugo.yaml 的配置里有这么个参数:
1markup:
2  highlight:
3    lineNumbersInTable: true
4    # lineNumbersInTable:使用表来格式化行号和代码, 而不是标签。这个属性一般设置为 true.
把这个 lineNumbersInTable 改成false后,代码块与行号就同步了,行号的滚动条已经消失了。然而新的问题又出现了:复制代码的时候行号也会被带上,鼠标点击选中的时候行号也会被选进去。找到了解决办法:
小白hugo博客装修笔记(2)- B1ain’s Blog
1.首先解决手动选中内容复制带行号的问题
在 /assets/scss/custom.scss 文件中添加如下内容,将行号设定为不可选中
1	// 禁止复制行号
2  .highlight .ln {
3    user-select: none;
4  }
2.解决copy按钮复制带行号的问题
修改 /assets/ts/main.ts 文件中的复制按钮逻辑:
 1highlights.forEach(highlight => {
 2    const copyButton = document.createElement('button');
 3    copyButton.innerHTML = copyText;
 4    copyButton.classList.add('copyCodeButton');
 5    highlight.appendChild(copyButton);
 6
 7    const codeBlock = highlight.querySelector('code[data-lang]');
 8    if (!codeBlock) return;
 9
10    copyButton.addEventListener('click', () => {
11        // 创建一个临时容器来克隆代码块的内容
12        const tempCodeBlock = codeBlock.cloneNode(true) as HTMLElement;
13
14        // 删除行号,行号的元素是 <span class="ln">
15        const lineNumbers = tempCodeBlock.querySelectorAll('.ln');
16        lineNumbers.forEach(lineNumber => lineNumber.remove());
17
18        // 获取没有行号的纯文本内容
19        const codeText = tempCodeBlock.textContent;
20
21        navigator.clipboard.writeText(codeText || '')
22        // navigator.clipboard.writeText(codeBlock.textContent)
23            .then(() => {
24                copyButton.textContent = copiedText;
25
26                setTimeout(() => {
27                    copyButton.textContent = copyText;
28                }, 1000);
29            })
30            .catch(err => {
31                alert(err)
32                console.log('Something went wrong', err);
33            });
34    });
35});
什么乱七八糟的bug
文字统计
在 layouts/partials/footer/footer.html 里增加以下代码,参考:
小白hugo博客装修笔记(1)- B1ain’s Blog
1<!-- Add total page and word count time -->
2<section class="totalcount">
3    {{$scratch := newScratch}}
4    {{ range (where .Site.Pages "Kind" "page" )}}
5        {{$scratch.Add "total" .WordCount}}
6    {{ end }}
7    📝{{$scratch.Get "total" }}字 ·
8    📖{{ len (where .Site.RegularPages "Section" "post") }}篇文章
9</section>
访客量统计
在 layouts/partials/footer/footer.html 里第一部分 <footer class="site-footer"> 中的 <section class="powerby"> 最后参考hugo+Stack 搭建个人博客 - Hyrtee’s Blog,增加以下代码:
 1<!-- insert busuanzi -->
 2{{ if .Site.Params.busuanzi.enable -}}
 3<div class="busuanzi-footer">
 4<span id="busuanzi_container_site_pv">
 5  本站总访问量<span id="busuanzi_value_site_pv"></span>次
 6</span>
 7<span id="busuanzi_container_site_uv">
 8  本站访客数<span id="busuanzi_value_site_uv"></span>人次
 9</span>
10</div>
11{{- end -}}
预览的时候统计数据会很夸张,不过部署之后就会显示真实的数据了。
热力图
热力图 由 椒盐豆豉 设计,由 Yelle 改进。新建 layouts/shortcodes/heatmap.html:
  1<div id="heatmap" style="
  2  max-width: 1900px;
  3  height: 180px;
  4  padding: 2px;
  5  text-align: center;
  6  "
  7></div>
  8<script src="https://cdn.jsdelivr.net/npm/[email protected]/dist/echarts.min.js"></script>
  9<script type="text/javascript">
 10  var chartDom = document.getElementById('heatmap');
 11  var myChart = echarts.init(chartDom);
 12  window.onresize = function() {
 13      myChart.resize();
 14  };
 15  var option;
 16
 17  // echart heatmap data seems to only support two elements tuple
 18  // it doesn't render when each item has 3 value
 19  // it also only pass first 2 elements when reading event param
 20  // so here we build a map to store additional metadata like link and title
 21  // map format {date: [{wordcount, link, title}]}
 22  // for more information see https://blog.douchi.space/hugo-blog-heatmap
 23  var dataMap = new Map();
 24  {{ range ((where .Site.RegularPages "Type" "post")) }}
 25    var key = {{ .Date.Format "2006-01-02" }};
 26    var value = dataMap.get(key);
 27    var wordCount = {{ .WordCount }};
 28    var link = {{ .RelPermalink}};
 29    var title = {{ .Title }};
 30
 31    // multiple posts in same day
 32    if (value == null) {
 33      dataMap.set(key, [{wordCount, link, title}]);
 34    } else {
 35      value.push({wordCount, link, title});
 36    }
 37  {{- end -}}
 38
 39  var data = [];
 40  // sum up the word count
 41  for (const [key, value] of dataMap.entries()) {
 42    var sum = 0;
 43    for (const v of value) {
 44      sum += v.wordCount;
 45    }
 46    data.push([key, (sum / 1000).toFixed(1)]);
 47  }
 48
 49  var startDate = new Date();
 50  var year_Mill = startDate.setFullYear((startDate.getFullYear() - 1));
 51  var startDate = +new Date(year_Mill);
 52  var endDate = +new Date();
 53
 54  var dayTime = 3600 * 24 * 1000;
 55  startDate = echarts.format.formatTime('yyyy-MM-dd', startDate);
 56  endDate = echarts.format.formatTime('yyyy-MM-dd', endDate);
 57
 58  // change date range according to months we want to render
 59  function heatmap_width(months){
 60    var startDate = new Date();
 61    var mill = startDate.setMonth((startDate.getMonth() - months));
 62    var endDate = +new Date();
 63    startDate = +new Date(mill);
 64
 65    endDate = echarts.format.formatTime('yyyy-MM-dd', endDate);
 66    startDate = echarts.format.formatTime('yyyy-MM-dd', startDate);
 67
 68    var showmonth = [];
 69    showmonth.push([
 70        startDate,
 71        endDate
 72    ]);
 73    return showmonth
 74  };
 75
 76  function getRangeArr() {
 77    const windowWidth = window.innerWidth;
 78    if (windowWidth >= 600) {
 79      return heatmap_width(12);
 80    } else if (windowWidth >= 400) {
 81      return heatmap_width(9);
 82    } else {
 83      return heatmap_width(6);
 84    }
 85  }
 86
 87  option = {
 88    title: {
 89        top: 0,
 90        left: 'center',
 91        text: '博客热力图'
 92    },
 93    tooltip: {
 94      hideDelay: 1000,
 95      enterable: true,
 96      formatter: function (p) {
 97        const date = p.data[0];
 98        const posts = dataMap.get(date);
 99        var content = `${date}`;
100        for (const [i, post] of posts.entries()) {
101            content += "<br>";
102            var link = post.link;
103            var title = post.title;
104            var wordCount = (post.wordCount / 1000).toFixed(1);
105            content += `<a href="${link}" target="_blank">${title} | ${wordCount} k</a>`
106        }
107        return content;
108      }
109    },
110    visualMap: {
111        min: 0,
112        max: 10,
113        type: 'piecewise',
114        orient: 'horizontal',
115        left: 'center',
116        top: 30,
117
118        inRange: {
119          //  [floor color, ceiling color]
120          color: ['#7aa8744c', '#7AA874' ]
121        },
122        splitNumber: 4,
123        text: ['千字', ''],
124        showLabel: true,
125        itemGap: 20,
126    },
127    calendar: {
128        top: 80,
129        left: 20,
130        right: 4,
131        cellSize: ['auto', 13],
132        range: getRangeArr(),
133        itemStyle: {
134            color: '#F1F1F1',
135            borderWidth: 1.5,
136            borderColor: '#fff',
137        },
138        yearLabel: { show: false },
139        // the splitline between months. set to transparent for now.
140        splitLine: {
141          lineStyle: {
142            color: 'rgba(0, 0, 0, 0.0)',
143            // shadowColor: 'rgba(0, 0, 0, 0.5)',
144            // shadowBlur: 5,
145            // width: 0.5,
146            // type: 'dashed',
147          }
148        }
149    },
150    series: {
151        type: 'heatmap',
152        coordinateSystem: 'calendar',
153        data: data,
154    }
155  };
156  myChart.setOption(option);
157  myChart.on('click', function(params) {
158    if (params.componentType === 'series') {
159      // open the first post on the day
160      const post = dataMap.get(params.data[0])[0];
161      const link = window.location.origin + post.link;
162      window.open(link, '_blank').focus();
163    }
164});
165</script>
然后我发现在暗黑模式下颜色显示会有点问题,于是我在 text: '博客热力图', 的下面加了一段代码改了一下颜色:
1textStyle: {
2    color: '#c0a3e5'
3}
感觉加载热力图的时候有点慢,干脆把 https://cdn.jsdelivr.net/npm/[email protected]/dist/echarts.min.js 下载下来放在 static/js 文件夹里,然后把 <script src=".../echarts.min.js"></script> 改成:
1<script src="/js/echarts.min.js"></script>
聊天气泡也能这么处理哦!
自定义emoji
又是大神的文章:Hugo | 为博客添加FF14表情包 - 小球飞鱼。首先建立 static/emoji 文件夹,之后在 layouts/shortcodes 下建立 emoji.html 模板,写入如下内容:
1{{ $name := .Get "name" }}
2<img
3    src="/emoji/{{ $name }}.{{ with .Get "ext" }}{{ . }}{{ else }}webp{{ end }}"
4    title="{{ with .Get "title" }}{{ . }}{{ else }}{{ $name }}{{ end }}"
5    alt="{{ with .Get "alt" }}{{ . }}{{ else }}{{ $name }}{{ end }}"
6    {{ with .Get "width" }} width="{{ . }}"{{ end }}
7    {{ with .Get "height" }} height="{{ . }}"{{ end }}
8/>
模板中限定图片默认后缀为webp,如果使用webp之外格式的图片,就需要写明ext=“格式名”。alt 参数在HTML的 <img> 标签中用于提供图像的替代文本描述。它的作用和用途包括:
-
无障碍性 - 当用户使用屏幕阅读器等辅助技术浏览网页时,屏幕阅读器会朗读alt文本,帮助视障用户理解图像内容。
-
图像无法加载时的显示 - 当图像因网络问题、链接错误等原因无法加载时,浏览器会显示alt文本代替图像。
-
SEO优化 - 搜索引擎使用alt文本来理解图像内容,有助于提高网页的搜索引擎优化。
-
符合Web标准 - HTML规范要求所有img标签都应该有alt属性,以符合Web内容无障碍指南(WCAG)。
在模板中,alt参数默认使用 $name 变量的值,但也可以通过 .Get "alt" 获取自定义的alt文本。
然后我发现多个emoji表情与文字并排的时候不在一个水平线上,很膈应,于是修改 assets/scss/custom.scss,在最后加上:
 1.article-page .main-article .article-content img[width$="36"],
 2.article-page .main-article .article-content img[width$="30"],
 3.article-page .main-article .article-content img[width$="40"],
 4.article-page .main-article .article-content img[width$="48"],
 5.article-page .main-article .article-content img[width$="52"],
 6.article-page .main-article .article-content img[width$="60"],
 7.article-page .main-article .article-content img[width$="72"],
 8.article-page .main-article .article-content img[width="100"] {
 9  margin-top: -5px;
10  border-radius: 13%;
11  display: inline-block;
12  vertical-align: middle;
13}
要注意限制 emoji 的设置尺寸,不然大图片也会沿用这个设置。咋一看有点像屎山代码,凑近一看确实是欸!算了,又不是不能用,先这么用着
![]()
应用:
1{{< emoji name="lazy" width="60" height="60" title="lazy" >}}
示例:


![]()
![]()
彩蛋
顺便弄个脚本获取 static/emoji/ 下的所有文件:
 1import os
 2
 3def generate_emoji_file_list():
 4    # 获取当前目录下的所有文件
 5    files = [f for f in os.listdir('.') if os.path.isfile(f)]
 6
 7    # 排序文件名(可选)
 8    files.sort()
 9
10    # 创建格式化的文本
11    formatted_text = ""
12    for i, file in enumerate(files, 1):
13        formatted_text += f"emoji{i}: \"/emoji/{file}\",\n"
14
15    # 将格式化的文本保存到文件
16    with open("emoji_files.txt", "w", encoding="utf-8") as f:
17        f.write(formatted_text)
18
19    print(f"已成功保存 {len(files)} 个文件名到 emoji_files.txt")
20
21if __name__ == "__main__":
22    generate_emoji_file_list()
可以把表情放到碎碎念页面里去呢 ~
玩转短代码
参考了大神的总结:Hugo|在Stack主题上可行的短代码们 - 眠于水月间
以下是新增的显示效果
好喜欢蓝色!
这个短代码只在电脑端生效
一些手动打码效果!
但总之换行的话就加个空标签。
数据删除!数据删除!
但总之换行的话就加个空标签。
点击显示
让我看看! 我挑的配色很好看吧!
好喜欢蓝色(再次)(再次)
但总之换行的话就加个空标签。
文字居左
文字居中
文字居右
Ctrl+Alt+Del
这个原来的键盘样式确实有点丑呢
好像不能插入图片?
Warning:需要双括号。
info:这是一条信息。
note:可以标注一下,但是没必要。
tip:在示例里胡说八道会使观看者会心一笑。
瀑布流图片


嵌入PDF


发现聊天气泡与图片轮播都不能折叠起来,不然就会报错。找了一圈都没找到解决办法,就这样吧 ,又不是不能用
打分短代码(支持半颗星)
大神们给出的打分短代码只能按总分十颗星、一颗一颗星去打分,感觉有点太累赘,而且那个星星图案也不好看:
那就参考前人的智慧魔改一下吧。新建 layouts/shortcodes/rate.html ,在里面写入:
1<div class="db-card-subject">
2    <div class="db-card-content">
3        <div class="rating">
4            <span class="description">{{ .Get "description" }}</span>
5            <span class="rating_nums"></span><span class="allstardark"><span class="allstarlight" style="width:{{ .Get "rate" }}0%"></span></span><span class="rating_float"></span></span>
6            <span class="rating_float_num">{{ .Get "rate_float" }}</span>
7        </div>
8    </div>
9</div>
在 assets/scss/custom.scss 后面加入:
 1/* db-card -------- start*/
 2.db-card{margin:2.5rem 3rem;background:var(--card-background);border-radius: 7px;box-shadow: 0 6px 10px 0 #00000053;}
 3.db-card-subject{display: flex;align-items:flex-start;line-height:1.6;padding:12px;position:relative;}
 4.dark .db-card{background:var(--card-background);}
 5.db-card-content {flex:1 1 auto;}
 6.db-card-post {width: 100px;margin-right: 15px;display: flex;flex: 0 0 auto;}
 7.db-card-title {margin-bottom: 3px;font-size: 14px;color: var(--card-text-color-main);;}
 8.db-card-title a{text-decoration: none!important}
 9.db-card-abstract,.db-card-comment{font-size:13px;overflow: auto;max-height:10rem;color: var(--card-text-color-main);;}
10.db-card-cate{position: absolute;top:0;right:0;background:#f99b01;padding:1px 8px;font-size:small;font-style:italic;border-radius:0 8px 0 8px;text-transform:capitalize;}
11.db-card-post img{width: 100px!important;height: 150px!important;border-radius: 4px;-o-object-fit: cover;object-fit: cover;}
12.rating{margin: 0 0 5px;font-size:13px;line-height: 1;display: flex;align-items: center;}
13.rating .allstardark{position:relative;color: #f99b01;height: 16px;width: 80px;background-size: auto 100%;margin-right: 8px;background-repeat: repeat;background-image: url(data:image/svg+xml;base64,PHN2ZyBjbGFzcz0iaWNvbiIgdmlld0JveD0iMCAwIDEwMjQgMTAyNCIgeG1sbnM9Imh0dHA6Ly93d3cudzMub3JnLzIwMDAvc3ZnIiB3aWR0aD0iMzIiIGhlaWdodD0iMzIiPjxwYXRoIGQ9Ik05MDguMSAzNTMuMWwtMjUzLjktMzYuOUw1NDAuNyA4Ni4xYy0zLjEtNi4zLTguMi0xMS40LTE0LjUtMTQuNS0xNS44LTcuOC0zNS0xLjMtNDIuOSAxNC41TDM2OS44IDMxNi4ybC0yNTMuOSAzNi45Yy03IDEtMTMuNCA0LjMtMTguMyA5LjMtMTIuMyAxMi43LTEyLjEgMzIuOS42IDQ1LjNsMTgzLjcgMTc5LjEtNDMuNCAyNTIuOWMtMS4yIDYuOS0uMSAxNC4xIDMuMiAyMC4zIDguMiAxNS42IDI3LjYgMjEuNyA0My4yIDEzLjRMNTEyIDc1NGwyMjcuMSAxMTkuNGM2LjIgMy4zIDEzLjQgNC40IDIwLjMgMy4yIDE3LjQtMyAyOS4xLTE5LjUgMjYuMS0zNi45bC00My40LTI1Mi45IDE4My43LTE3OS4xYzUtNC45IDguMy0xMS4zIDkuMy0xOC4zIDIuNy0xNy41LTkuNS0zMy43LTI3LTM2LjN6TTY2NC44IDU2MS42bDM2LjEgMjEwLjNMNTEyIDY3Mi43IDMyMy4xIDc3MmwzNi4xLTIxMC4zLTE1Mi44LTE0OUw0MTcuNiAzODIgNTEyIDE5MC43IDYwNi40IDM4MmwyMTEuMiAzMC43LTE1Mi44IDE0OC45eiIgZmlsbD0iI2Y5OWIwMSIvPjwvc3ZnPg==);
14}
15.rating .allstarlight{position: absolute;left: 0;color: #f99b01;height:16px;overflow: hidden;background-size: auto 100%;background-repeat: repeat;background-image: url(data:image/svg+xml;base64,PHN2ZyBjbGFzcz0iaWNvbiIgdmlld0JveD0iMCAwIDEwMjQgMTAyNCIgeG1sbnM9Imh0dHA6Ly93d3cudzMub3JnLzIwMDAvc3ZnIiB3aWR0aD0iMzIiIGhlaWdodD0iMzIiPjxwYXRoIGQ9Ik05MDguMSAzNTMuMWwtMjUzLjktMzYuOUw1NDAuNyA4Ni4xYy0zLjEtNi4zLTguMi0xMS40LTE0LjUtMTQuNS0xNS44LTcuOC0zNS0xLjMtNDIuOSAxNC41TDM2OS44IDMxNi4ybC0yNTMuOSAzNi45Yy03IDEtMTMuNCA0LjMtMTguMyA5LjMtMTIuMyAxMi43LTEyLjEgMzIuOS42IDQ1LjNsMTgzLjcgMTc5LjEtNDMuNCAyNTIuOWMtMS4yIDYuOS0uMSAxNC4xIDMuMiAyMC4zIDguMiAxNS42IDI3LjYgMjEuNyA0My4yIDEzLjRMNTEyIDc1NGwyMjcuMSAxMTkuNGM2LjIgMy4zIDEzLjQgNC40IDIwLjMgMy4yIDE3LjQtMyAyOS4xLTE5LjUgMjYuMS0zNi45bC00My40LTI1Mi45IDE4My43LTE3OS4xYzUtNC45IDguMy0xMS4zIDkuMy0xOC4zIDIuNy0xNy41LTkuNS0zMy43LTI3LTM2LjN6IiBmaWxsPSIjZjk5YjAxIi8+PC9zdmc+);}
16@media (max-width:550px) {
17	.db-card{margin:0.8rem 1rem;}
18	.db-card-comment{display: none;}
19}
20/* db-card -------- end */
21
22/* Add this to your custom CSS file */
23.rating_score {
24  margin-left: 10px;
25  color: #ff9900;
26  font-weight: bold;
27}
28
29.description {
30  margin-right: 10px; /* Adds space between description and stars */
31  display: inline-block; /* Ensures margin works properly */
32  font-size: 16px; /* Increases font size */
33}
34
35/* Increase star size */
36.allstardark {
37  display: inline-block;
38  width: 100px; /* Increased from 75px */
39  height: 10px; /* Increased from 15px */
40  background: url('/images/star-empty.png') repeat-x;
41  background-size: 10px 10px; /* Increased from 15px 15px */
42  position: relative;
43  vertical-align: middle; /* Aligns stars with text */
44}
45
46.allstarlight {
47  display: inline-block;
48  height: 10px; /* Increased from 15px */
49  background: url('/images/star-filled.png') repeat-x;
50  background-size: 10px 10px; /* Increased from 15px 15px */
51  position: absolute;
52  top: 0;
53  left: 0;
54}
55
56/* Style the rating score */
57.rating_float_num {
58  margin-left: 2px; /* Add space after stars */
59  font-size: 16px; /* Match font size */
60  vertical-align: middle; /* Align with stars */
61  line-height: 0;
62}
63
64.rating .allstardark{position:relative;color: #f99b01;height: 16px;width: 80px;background-size: auto 100%;margin-right: 8px;background-repeat: repeat;background-image: url(data:image/svg+xml;base64,PHN2ZyBjbGFzcz0iaWNvbiIgdmlld0JveD0iMCAwIDEwMjQgMTAyNCIgeG1sbnM9Imh0dHA6Ly93d3cudzMub3JnLzIwMDAvc3ZnIiB3aWR0aD0iMzIiIGhlaWdodD0iMzIiPjxwYXRoIGQ9Ik05MDguMSAzNTMuMWwtMjUzLjktMzYuOUw1NDAuNyA4Ni4xYy0zLjEtNi4zLTguMi0xMS40LTE0LjUtMTQuNS0xNS44LTcuOC0zNS0xLjMtNDIuOSAxNC41TDM2OS44IDMxNi4ybC0yNTMuOSAzNi45Yy03IDEtMTMuNCA0LjMtMTguMyA5LjMtMTIuMyAxMi43LTEyLjEgMzIuOS42IDQ1LjNsMTgzLjcgMTc5LjEtNDMuNCAyNTIuOWMtMS4yIDYuOS0uMSAxNC4xIDMuMiAyMC4zIDguMiAxNS42IDI3LjYgMjEuNyA0My4yIDEzLjRMNTEyIDc1NGwyMjcuMSAxMTkuNGM2LjIgMy4zIDEzLjQgNC40IDIwLjMgMy4yIDE3LjQtMyAyOS4xLTE5LjUgMjYuMS0zNi45bC00My40LTI1Mi45IDE4My43LTE3OS4xYzUtNC45IDguMy0xMS4zIDkuMy0xOC4zIDIuNy0xNy41LTkuNS0zMy43LTI3LTM2LjN6TTY2NC44IDU2MS42bDM2LjEgMjEwLjNMNTEyIDY3Mi43IDMyMy4xIDc3MmwzNi4xLTIxMC4zLTE1Mi44LTE0OUw0MTcuNiAzODIgNTEyIDE5MC43IDYwNi40IDM4MmwyMTEuMiAzMC43LTE1Mi44IDE0OC45eiIgZmlsbD0iI2Y5OWIwMSIvPjwvc3ZnPg==);
65}
66.rating .allstarlight{position: absolute;left: 0;color: #f99b01;height:16px;overflow: hidden;background-size: auto 100%;background-repeat: repeat;background-image: url(data:image/svg+xml;base64,PHN2ZyBjbGFzcz0iaWNvbiIgdmlld0JveD0iMCAwIDEwMjQgMTAyNCIgeG1sbnM9Imh0dHA6Ly93d3cudzMub3JnLzIwMDAvc3ZnIiB3aWR0aD0iMzIiIGhlaWdodD0iMzIiPjxwYXRoIGQ9Ik05MDguMSAzNTMuMWwtMjUzLjktMzYuOUw1NDAuNyA4Ni4xYy0zLjEtNi4zLTguMi0xMS40LTE0LjUtMTQuNS0xNS44LTcuOC0zNS0xLjMtNDIuOSAxNC41TDM2OS44IDMxNi4ybC0yNTMuOSAzNi45Yy03IDEtMTMuNCA0LjMtMTguMyA5LjMtMTIuMyAxMi43LTEyLjEgMzIuOS42IDQ1LjNsMTgzLjcgMTc5LjEtNDMuNCAyNTIuOWMtMS4yIDYuOS0uMSAxNC4xIDMuMiAyMC4zIDguMiAxNS42IDI3LjYgMjEuNyA0My4yIDEzLjRMNTEyIDc1NGwyMjcuMSAxMTkuNGM2LjIgMy4zIDEzLjQgNC40IDIwLjMgMy4yIDE3LjQtMyAyOS4xLTE5LjUgMjYuMS0zNi45bC00My40LTI1Mi45IDE4My43LTE3OS4xYzUtNC45IDguMy0xMS4zIDkuMy0xOC4zIDIuNy0xNy41LTkuNS0zMy43LTI3LTM2LjN6IiBmaWxsPSIjZjk5YjAxIi8+PC9zdmc+);}
最后效果:
使用:
1//实际使用时应为双括号
2{< rate rate=9 rate_float="8.5" description="Claude" >}
3
4{< rate rate=7 rate_float="7.2" description="ChatGPT" >}
写在最后
参考链接
首推非常详尽的 Hugo 介绍:
碎碎念
刚开始这篇文章只是记录一下我为博客添加了评论系统和灯箱,后面装修的东西就越来越多了,什么多语言、字体、文章加密等等这些,都是我刚开始就想搞但一直没搞定的东西。花了大半个月终于把博客装修的差不多了,折腾一下还是挺有乐趣的,有几天为了解决文章加密和多语言的问题还熬了夜。(虽然最后也不是我解决的呜呜呜太菜了)为了我这破破的博客也是值得的吧,暂时应该不会大改了。刚好这几天天气不错,出去耍耍,走!